
Cutting - No Pain No Gain, Right?
In the first of three articles, Helen Longridge takes a look at the evolution of mount cutters.
There are many virtues to the simple scalpel, left handed use being one of them, BUT when it comes to cutting a straight line with a bevelled angle...
Wind back a few decades to the 70s. My parents were recently married; they were also broke! Instead of paying a framer to frame their few prized paintings, Dad decided to learn the trade. He attended a course at West Dean College.
 The good old days!
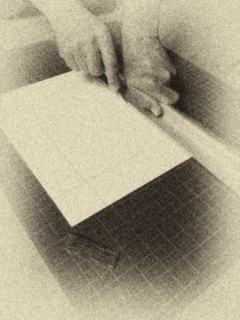
“Mount Cutter” Number 1 - The Scalpel (simple and cheap)
Run the scalpel blade along the edge of a steel rule whilst pushing down on the rule, with the other hand, to secure the position of the mount. Tilt the blade to a 45° angle to accomplish the beveled edge. Remember to stop at exactly the right place, avoiding any overcuts on your corners!
This required the use of a steady hand and some patience. Cutting through mountboard, which is a tough mixture of wood pulp fibres
firmly pressed together, is hard work. Your forearm, upper arm and index finger must be resilient to pressure and continued exertion. Slipping with either hand is not an option!
My partner Chris is very gifted practically. My mother, on the other hand, is likely to slice her hands when left anywhere near an open blade. Let’s just say the scalpel is not for everyone.
Mount Cutter Number 2 – The Handheld Cutter (safer)
A much safer option: This is a contraption that holds the blade at a fixed angle AND has a stop marker on it!
Butt the cutter up against the edge of the steel rule. Use the marker to guide you where to start. Insert the blade and push it along the rail until you reach the stop line, using the marker as a guide.
Mount Cutter Number 3 – The System (accurate and supportive)
MODERN TECHNOLOGY - PRECISION ENGINEERING
Phew! Wind forward to the 21st century and a number of models later: Finally, we now have a full blown, all in one, mount cutting system, engineered by specific technology to ensure minimal effort and superb accuracy.
Simply mark up the mount using a Longridge Border Marker, slide the mount under the rail and up to the mountboard stop. This secures it into position. Locate the cutter onto the rail and position it at the start, using the reference mark. Adjust the cutter stops; these prevent over cutting and ensure perfect corners. Insert the blade; this is fully supported by the SprintMat underneath, which ensures a straight line cut. Push the cutter along the rail until you feel it stop at the cutter stop. Repeat for all sides. The aperture just drops out, bliss!
Helen Longridge ©2019 All Rights Reserved